In this post, I will explain how an AI powered n8n workflow is used to create attractive Instagram posts for the Royal Shahnaz beauty salon.
This Instagram post creation workflow can help you set up your own Instagram Engine – the workflow JSON will be provided at the end. This way, you can set up and tweak the workflow to suit your own needs.
I used the gpt-5-mini model by OpenAI for caption and hashtag generation and the Nano Banana model by Google for post image creation.
This was done by me as part of the final project of my n8n course @ Galtech institute in Kerala. I have not asked or received any help for creating this.
What is AI Powered Instagram Post Creation?
Creating Instagram posts by hand is a costly and time consuming process. It involves creative content writers and designers who need to collaborate and create post captions, images and add hashtags.
I thought, “Why can’t I use AI to speed up the process?” Consistency is key – this will also be solved by the AI workflow.
In my workflow, AI Automation helps automate Instagram post creation, thus saving time and money.
Don’t worry, it will not be posted automatically. The Instagram post image will be saved to a Google Drive folder, while the Caption and Hashtags will go into a Google Sheet. Thus, I can review and fix errors, if any, before posting.
Why Use n8n for Instagram Post Creation?
What is n8n?
n8n is an open-source workflow automation platform on which I built this workflow. It lets you connect apps, APIs, databases, and AI tools into multi-step automations using a visual, node-based builder.
It is for technical teams – it allows you to drag and drop and connect nodes, but it also involves some JavaScript to be used in the Code nodes. Thus, it is considered a no-code and low-code automation platform.
It can be used in the cloud or self-hosted setups. In self-hosted mode, Hostinger VPS is the best way to get set and run asap. I am running n8n on Hostinger currently.
| Task | Manual | n8n Automation |
|---|---|---|
| Image creation | Designer needed | AI generated |
| Caption writing | Manual | GPT |
| Hashtags | Research | AI + tools |
| Posting workflow | Repetitive | Automated |
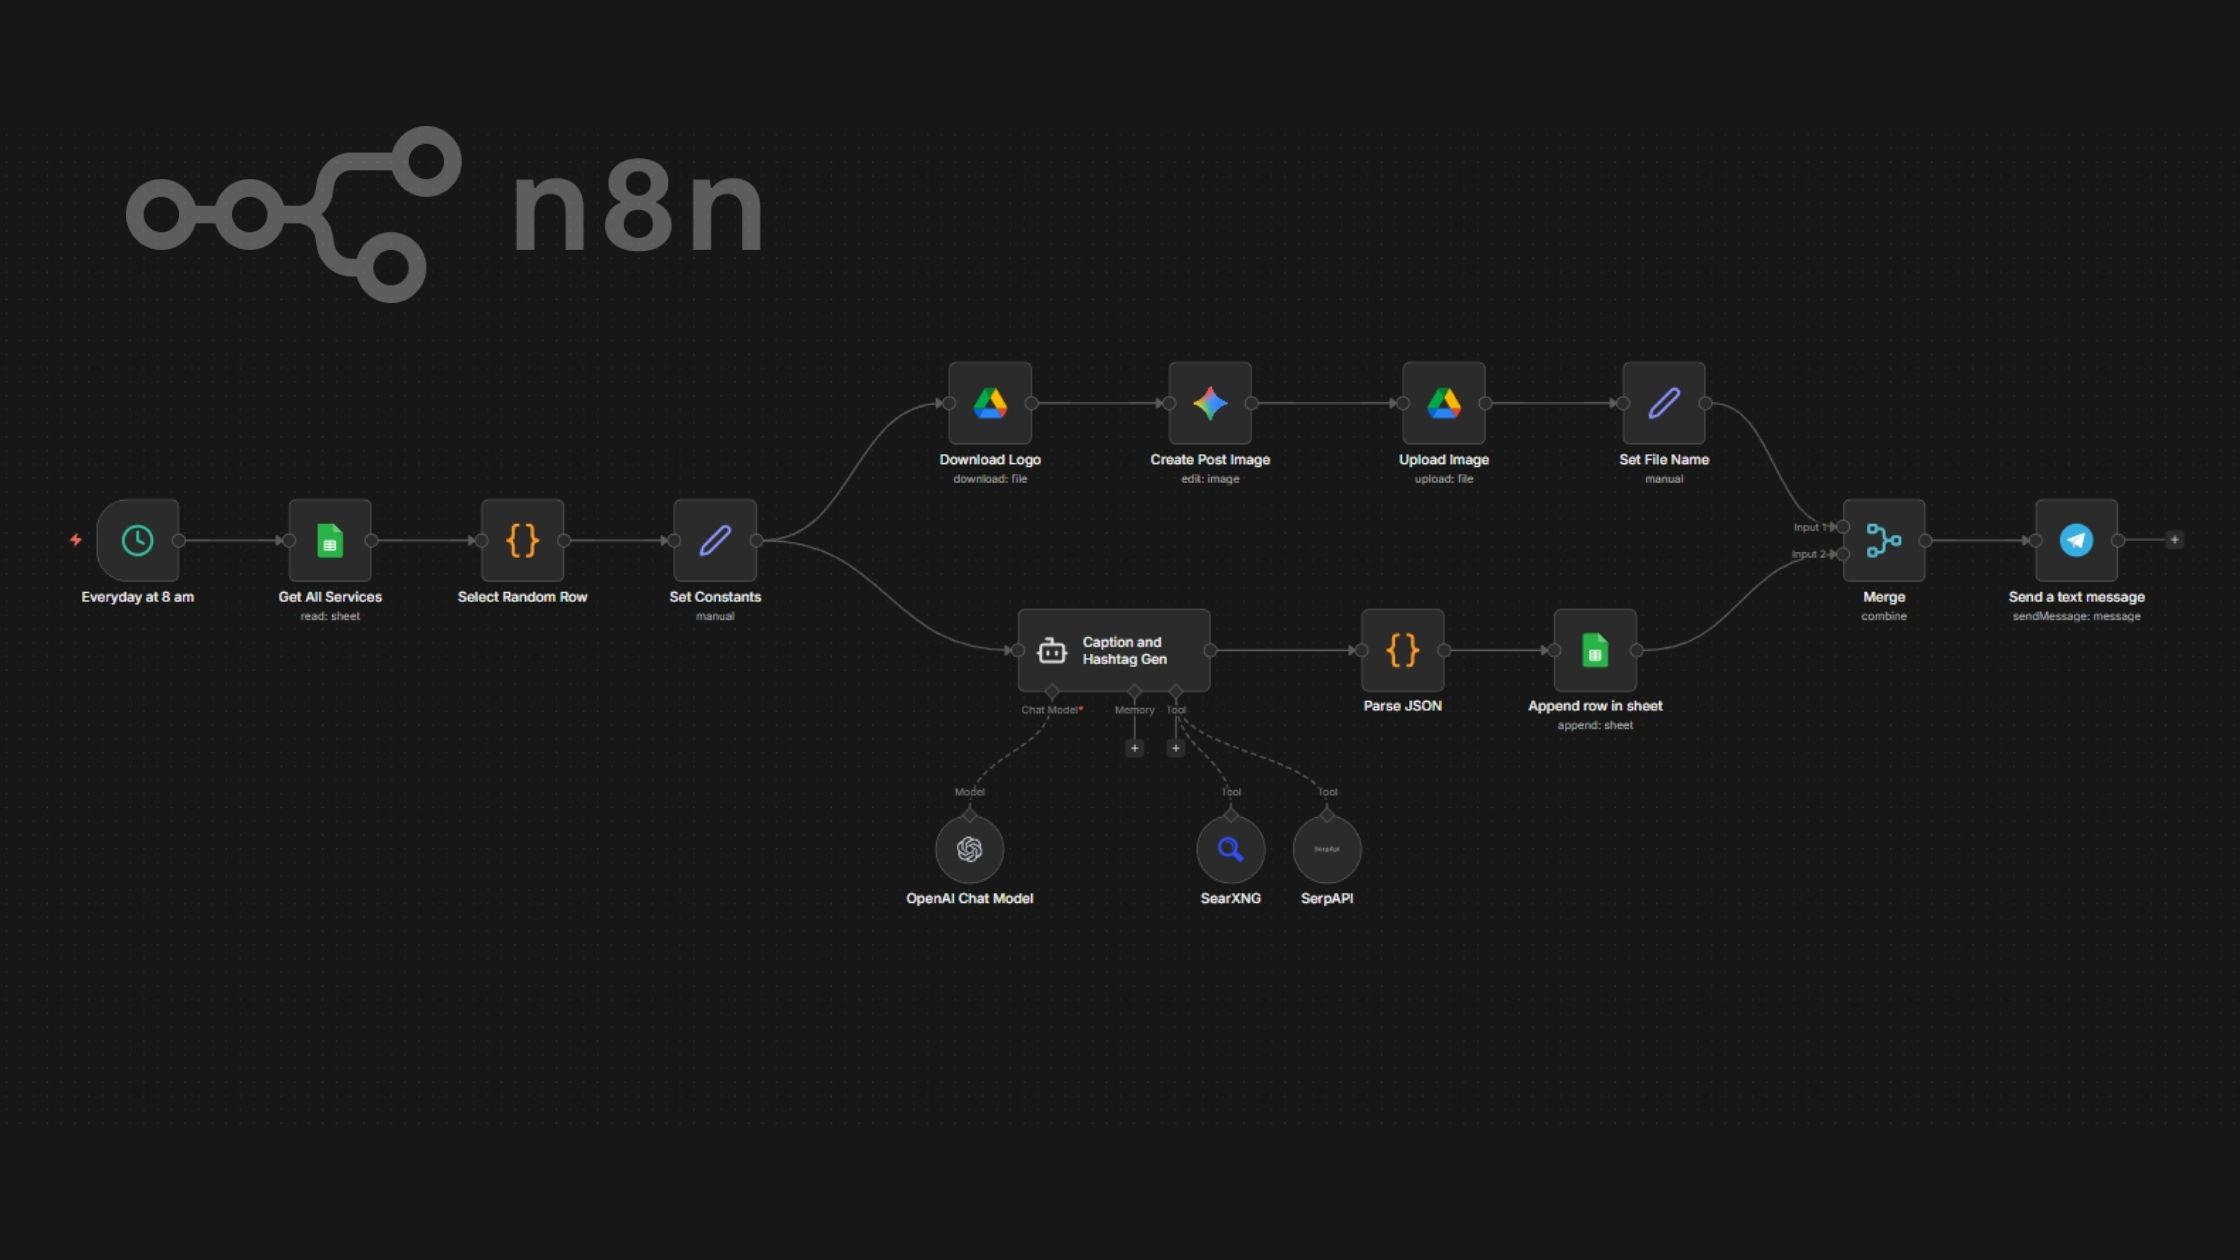
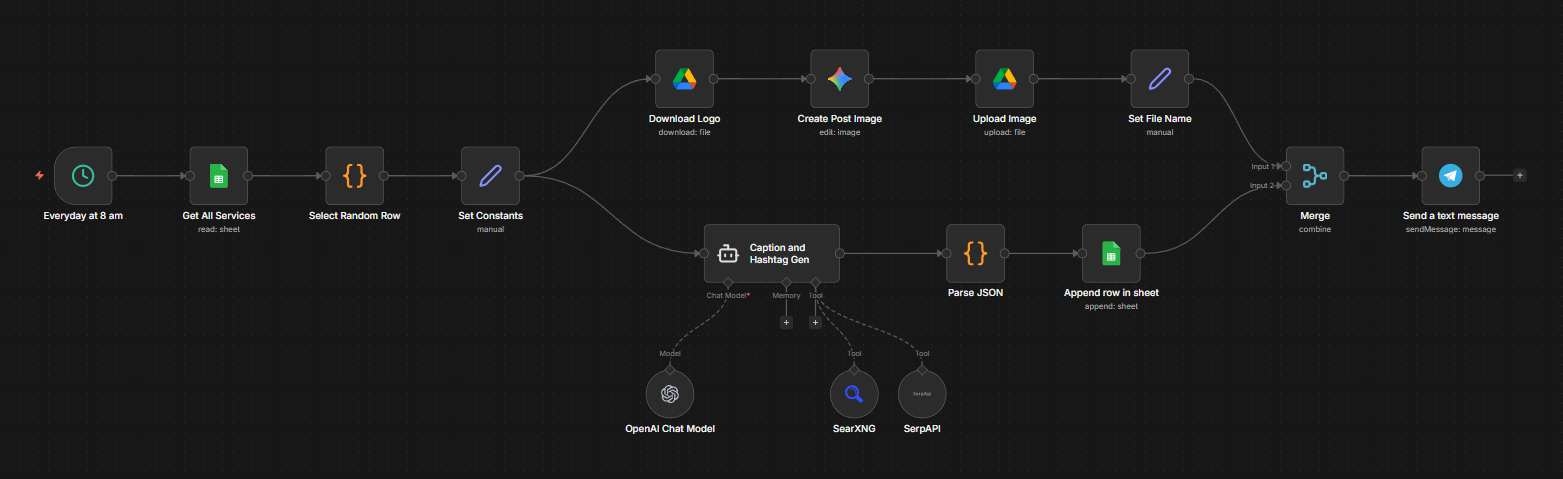
Overview of the Workflow
The n8n workflow runs every day at a set time (8 am). It first picks a random service from a Google Sheet of beauty salon services. It then generates an image with the beauty salon logo as input. This is done using the Google Nano Banana model. The image is uploaded to a Google Drive folder.
Next, an AI Agent generates the caption and hashtags for the selected service using the gpt-5-mini model from OpenAI and tools that search the Internet for the latest hashtags. These are then appended to a Google Sheet.
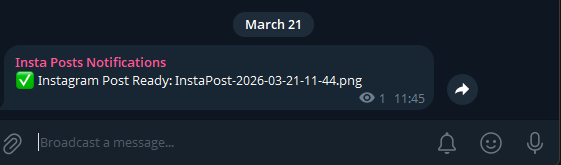
Once this is done, the workflow notifies me via Telegram that a new post is available for me to review.
Step-by-Step Walkthrough
Schedule Trigger Node
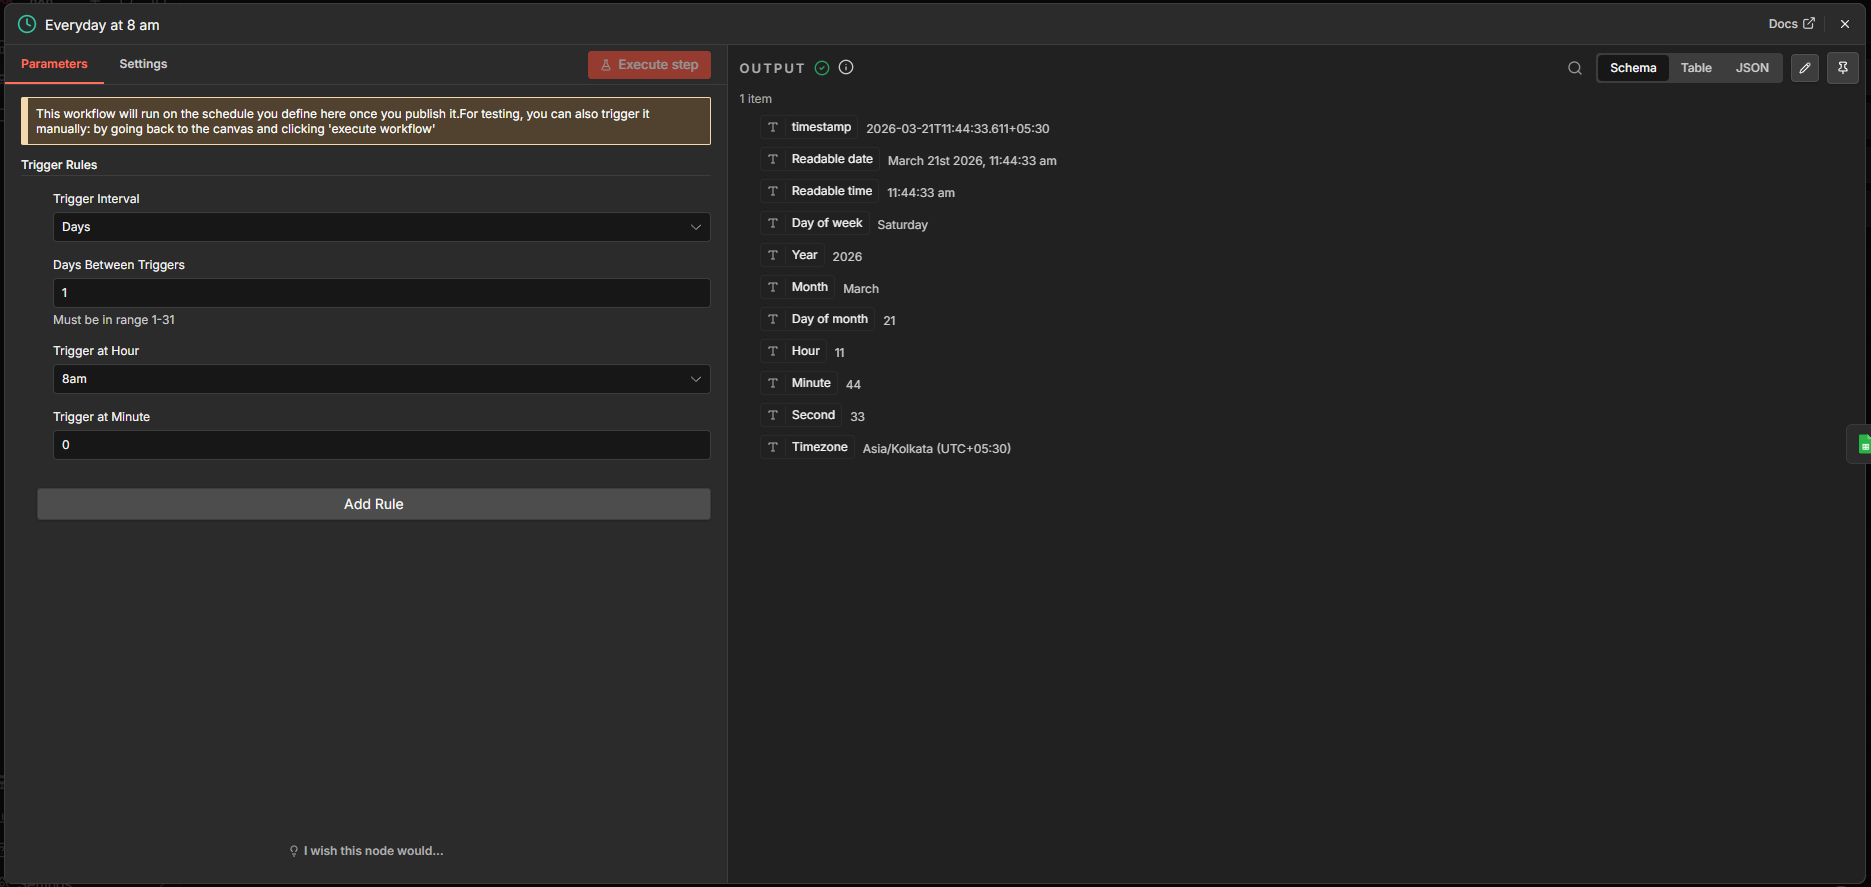
The Schedule Trigger node is set to trigger the workflow at 8 am every day.
Data Source (Google Sheets)
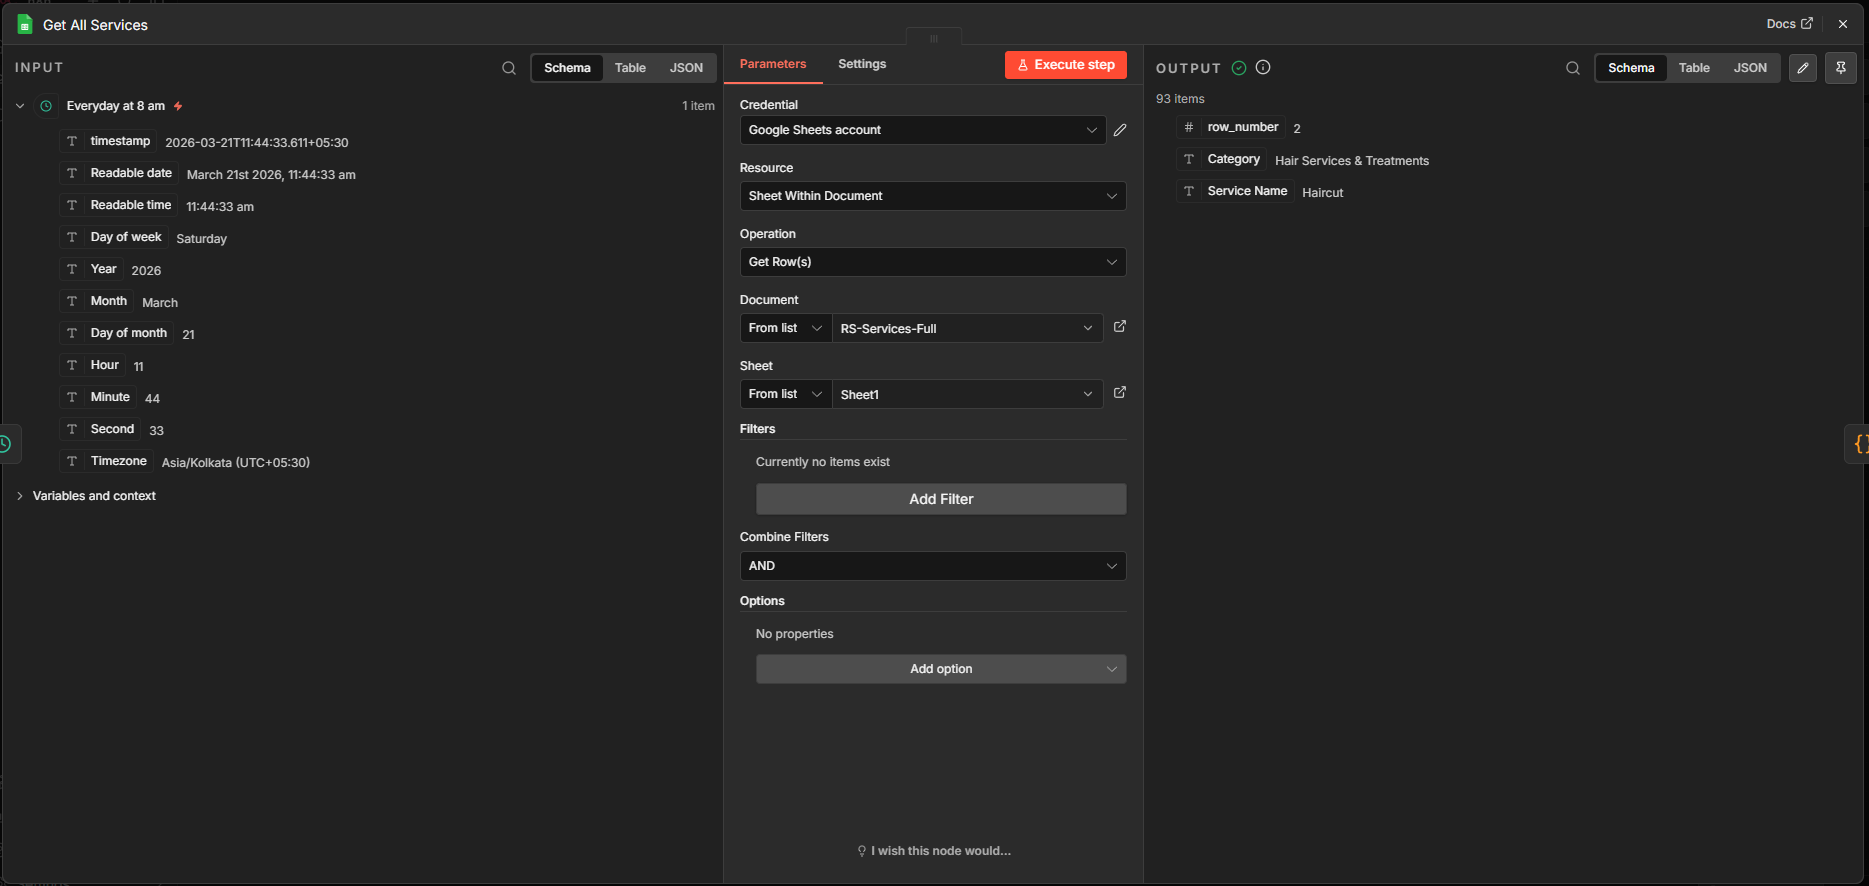
The Google Sheets node is configured to get all rows (services) from the Services sheet.
Add a Google Sheets node and select the action “Get rows in sheet”. But first, create a new OAuth credential for Google Sheets.
Select Random Row (Code node)

Using the Code node, I selected a random row. Here’s the code, which:
- stores all input in an array called items
- generates a random index that can be used to select any item in the array (0 to length of array – 1)
- returns the random item.
					// Get all incoming items from the previous node
// Each item represents one row from Google Sheets
const items = $input.all();

// Generate a random number between 0 and (items.length - 1)
// This will be used as the index to pick a random row
const randomIndex = Math.floor(Math.random() * items.length);

// Return only ONE item (the randomly selected one)
// It must be returned as an array for n8n to process it
return [items[randomIndex]];
Set Constants (Edit fields node)
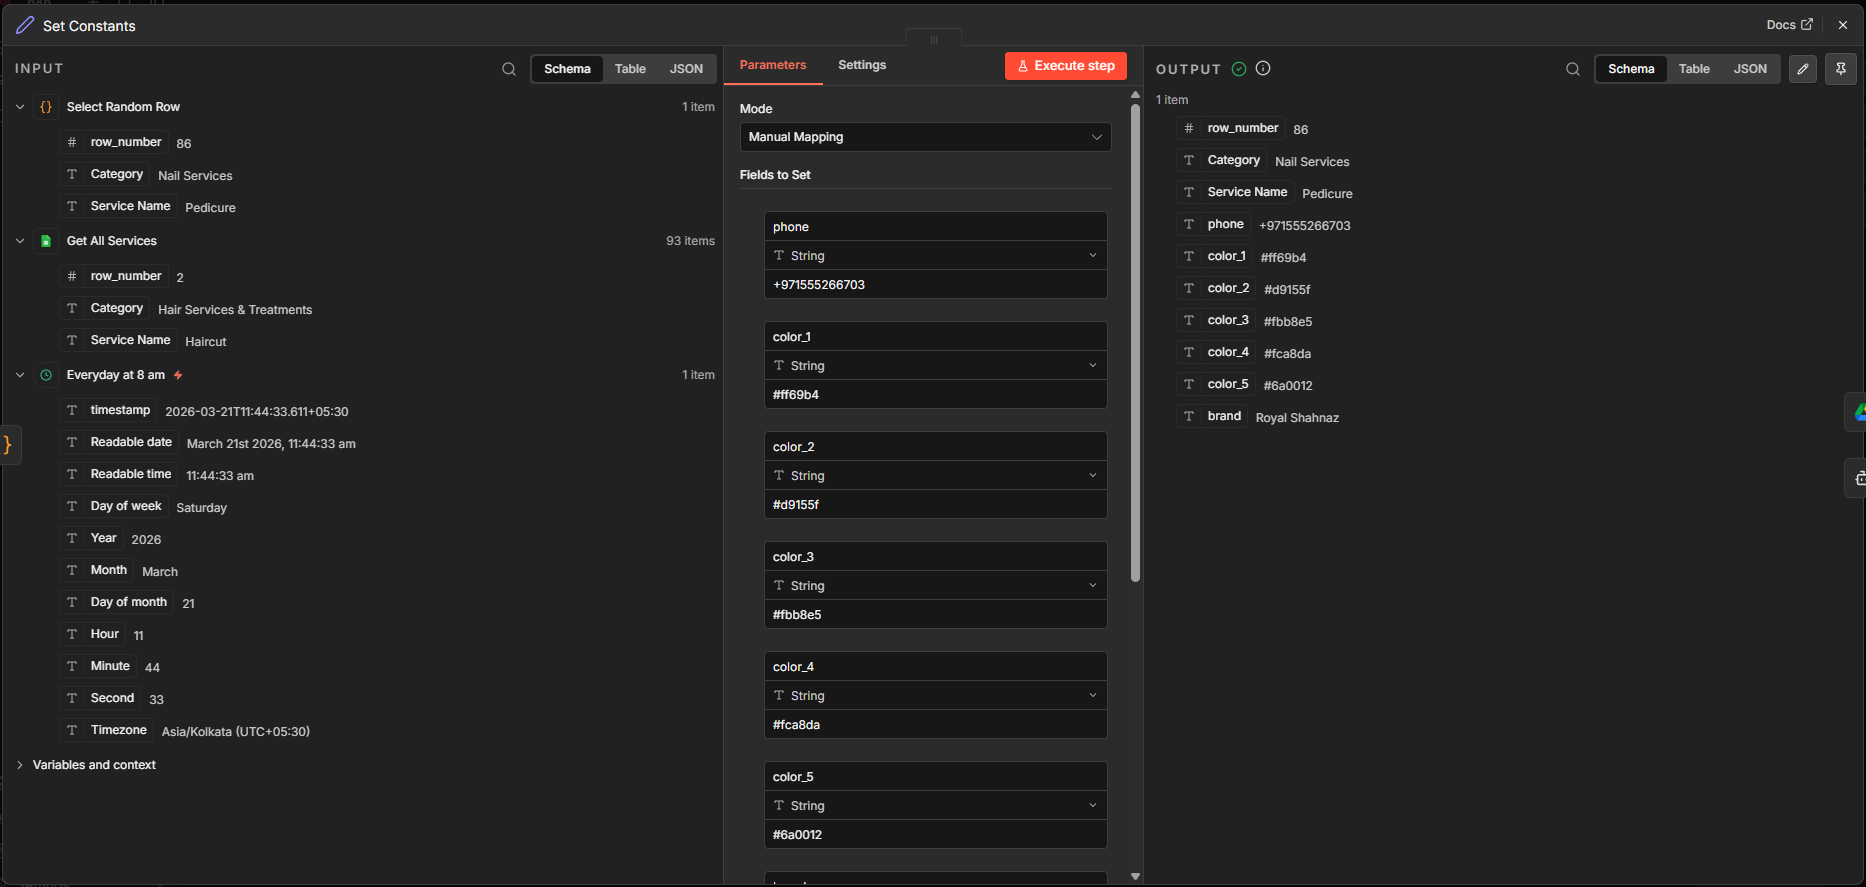
The Set (Edit Fields) node is used to set variables and filter unwanted key-value pairs. In this node, I set the phone number and the color scheme to be used for generating the image in a later node (5 colors from the client site).
Download Logo (Google Drive node)
I uploaded the Royal Shahnaz logo to a Drive folder. I added a Google Drive node and selected the action “Download file”. Next, I enabled the Google Drive API from Google Cloud Console and set the OAuth credentials for Drive. Selected the logo from the file list. You can also specify a Drive URL pointing to the logo. When executed, it downloads and stores the binary file in a field called “data”.
Create Post Image (Google Gemini node)
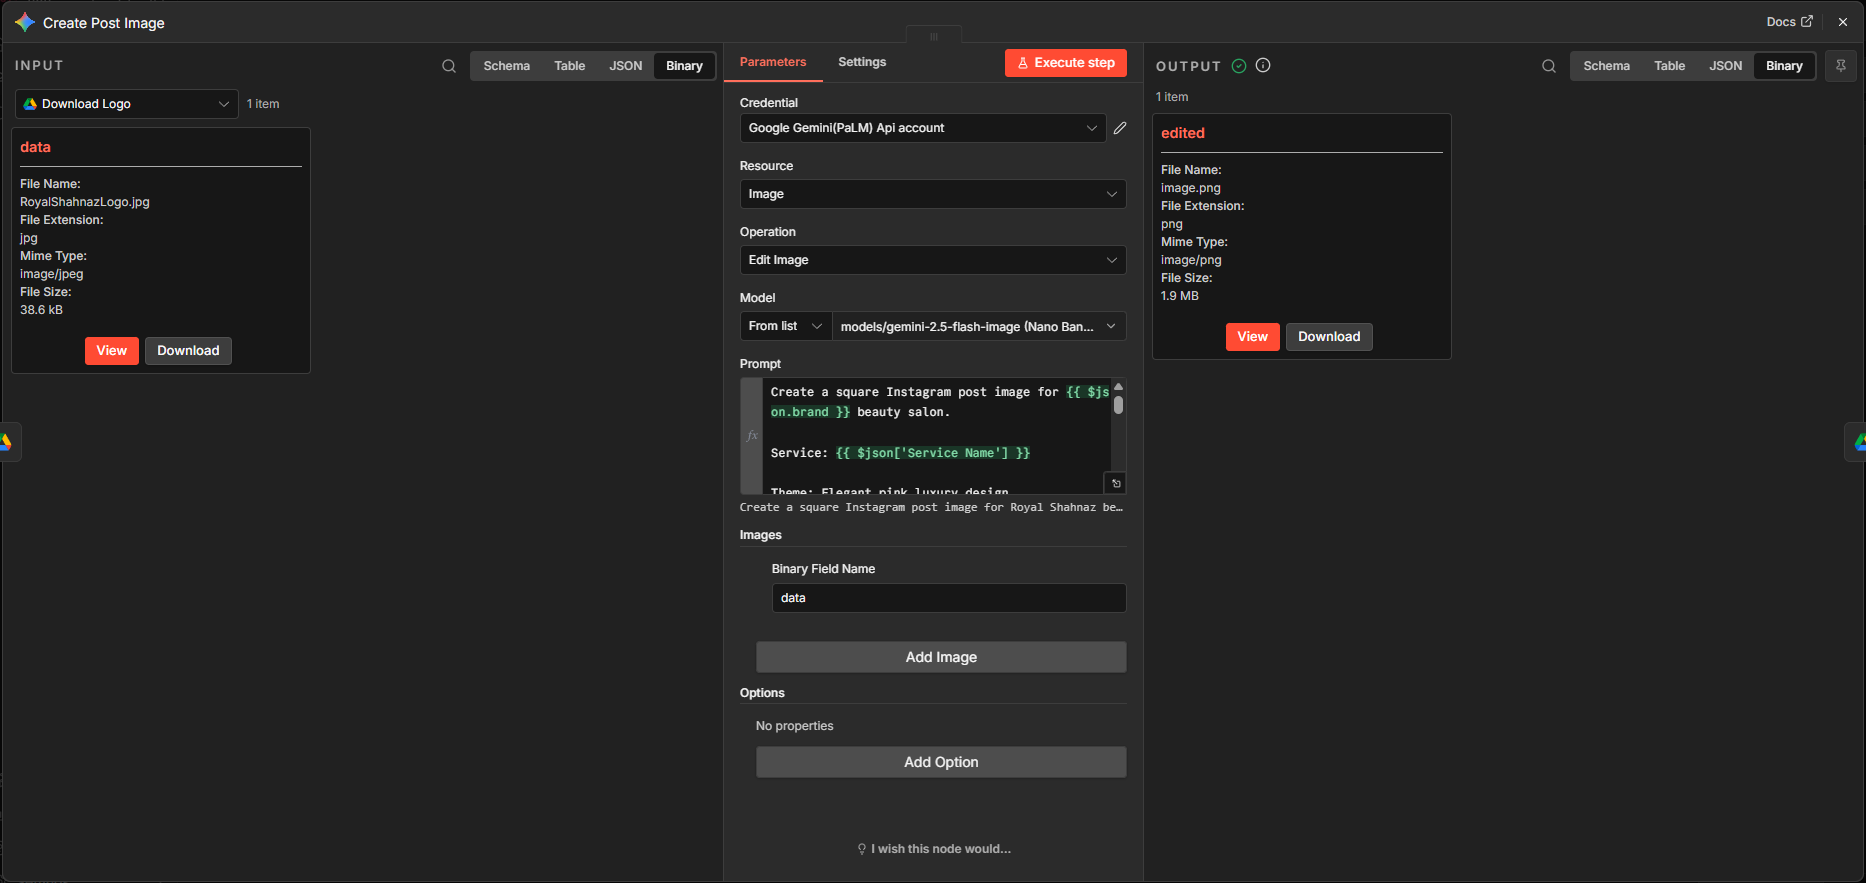
I used a Google Gemini node to create the Instagram post image. I selected “Edit an image” action after adding the node.
Then I added new credentials using the docs.
This node uses the logo downloaded in the previous step as input and creates a square Instagram post image that includes the logo, caption, phone, and given color scheme.
I selected the “Nano Banana” model and gave the following prompt:
					Create a square Instagram post image for {{ $json.brand }} beauty salon.

Service: {{ $json['Service Name'] }}

Theme: Elegant pink luxury design.

Colors:
{{ $json.color_1 }}, {{ $json.color_2 }}, {{ $json.color_3 }}, {{ $json.color_4 }}, {{ $json.color_5 }}

Include:
- Logo from the given image. It should be clear and prominent.
- Phone number: {{ $json.phone }}
- one short caption that is catchy and modern, 10 words max.
- Modern beauty salon layout
- Clean typography
- High quality, social media ready

Style: Premium, feminine, professional
Upload Image (Google Drive node)
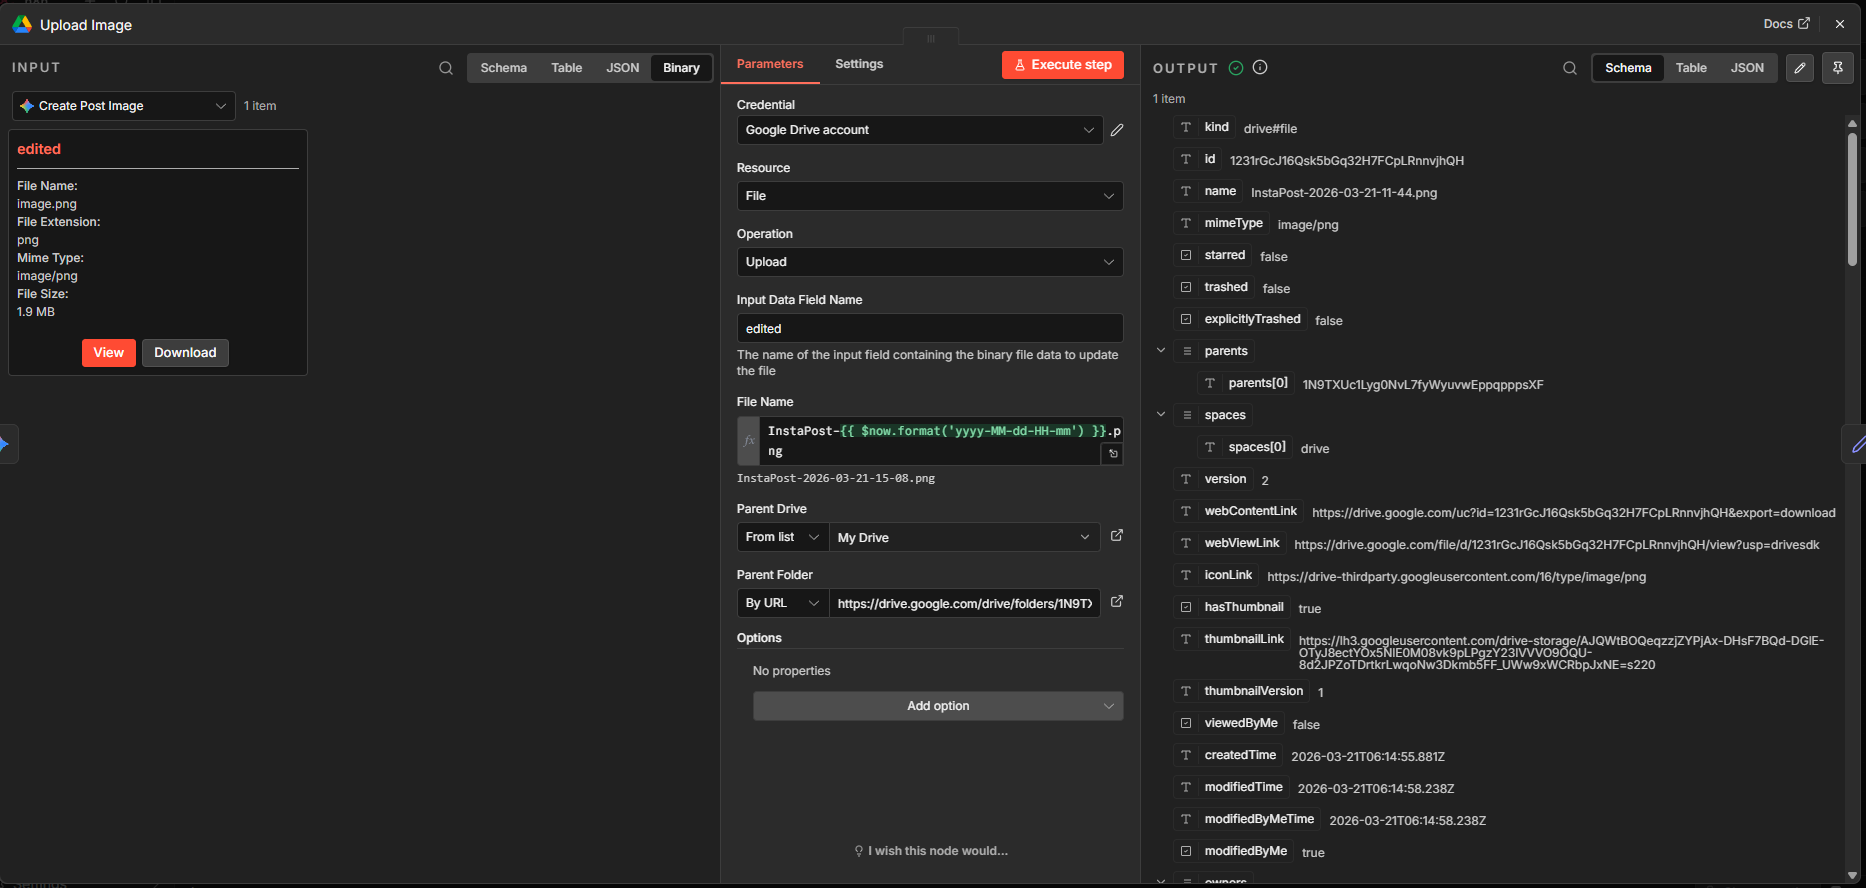
I added another Google Drive node and chose the action “Upload file”. Input data is the “edited” file from the previous node. I decided to name the file according to the date and time for uniqueness and ease of finding the image in the folder.
Remember that everything within {{ }} is Javascript.
I gave the URL of the folder to upload to, this time.
InstaPost-{{ $now.format('yyyy-MM-dd-HH-mm') }}.png
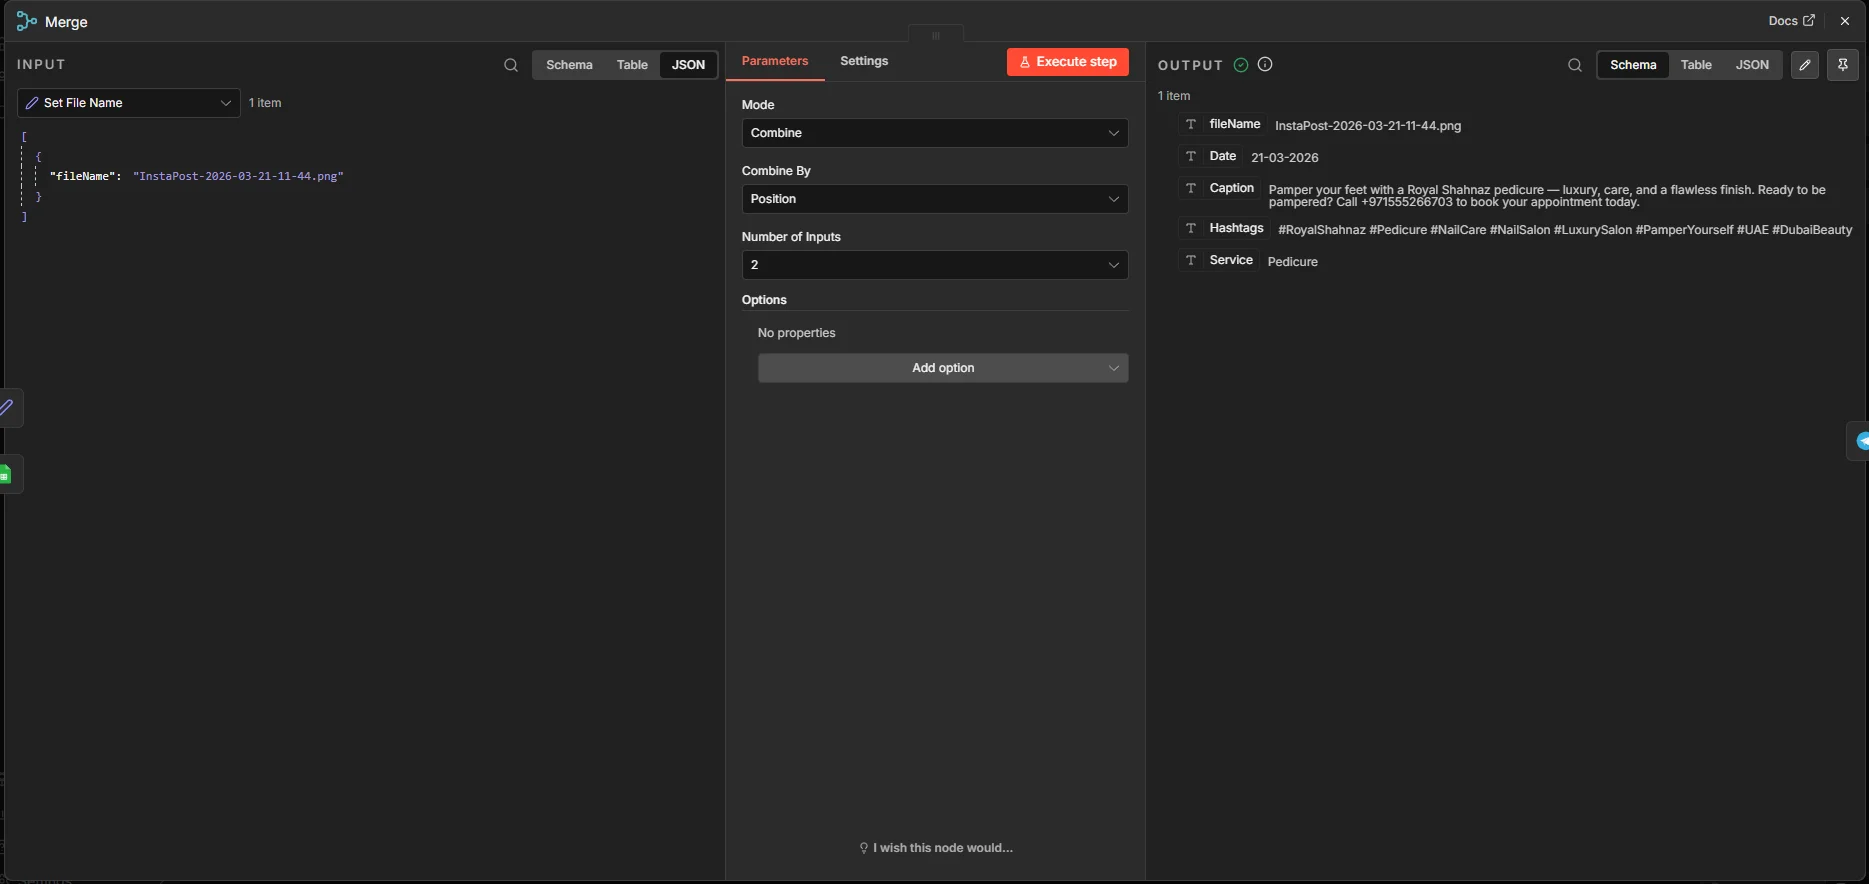
Set File Name (Edit fields node)
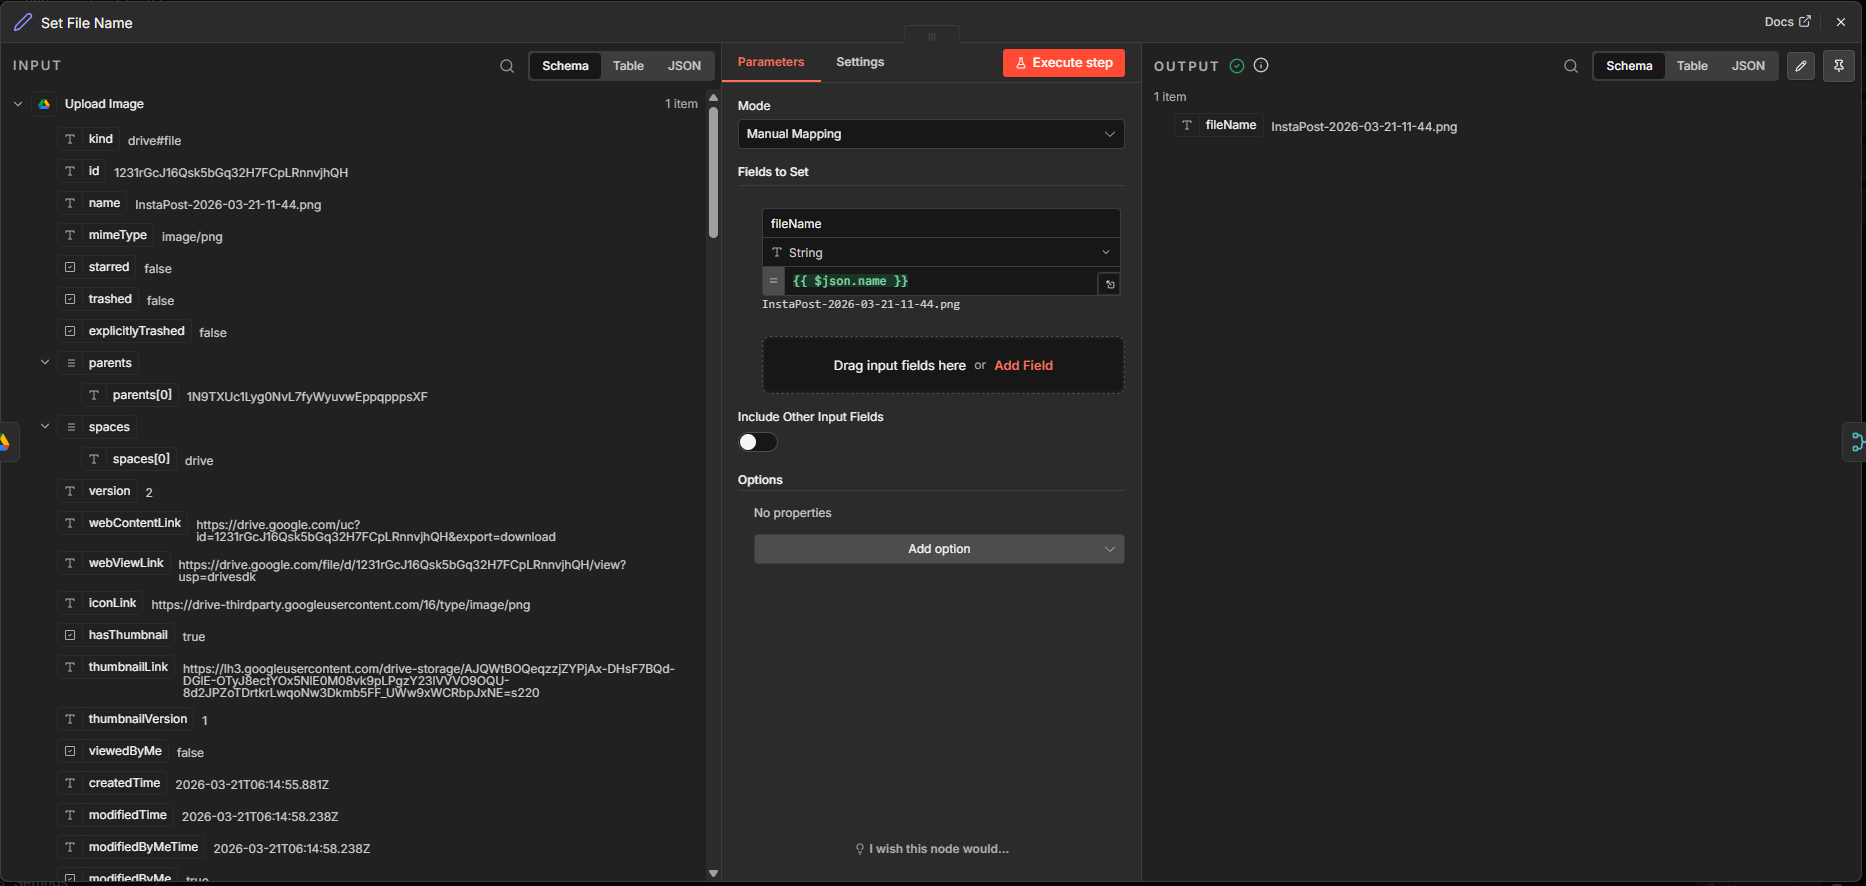
Another Edit fields node is used to pass only the file name and filter everything else.
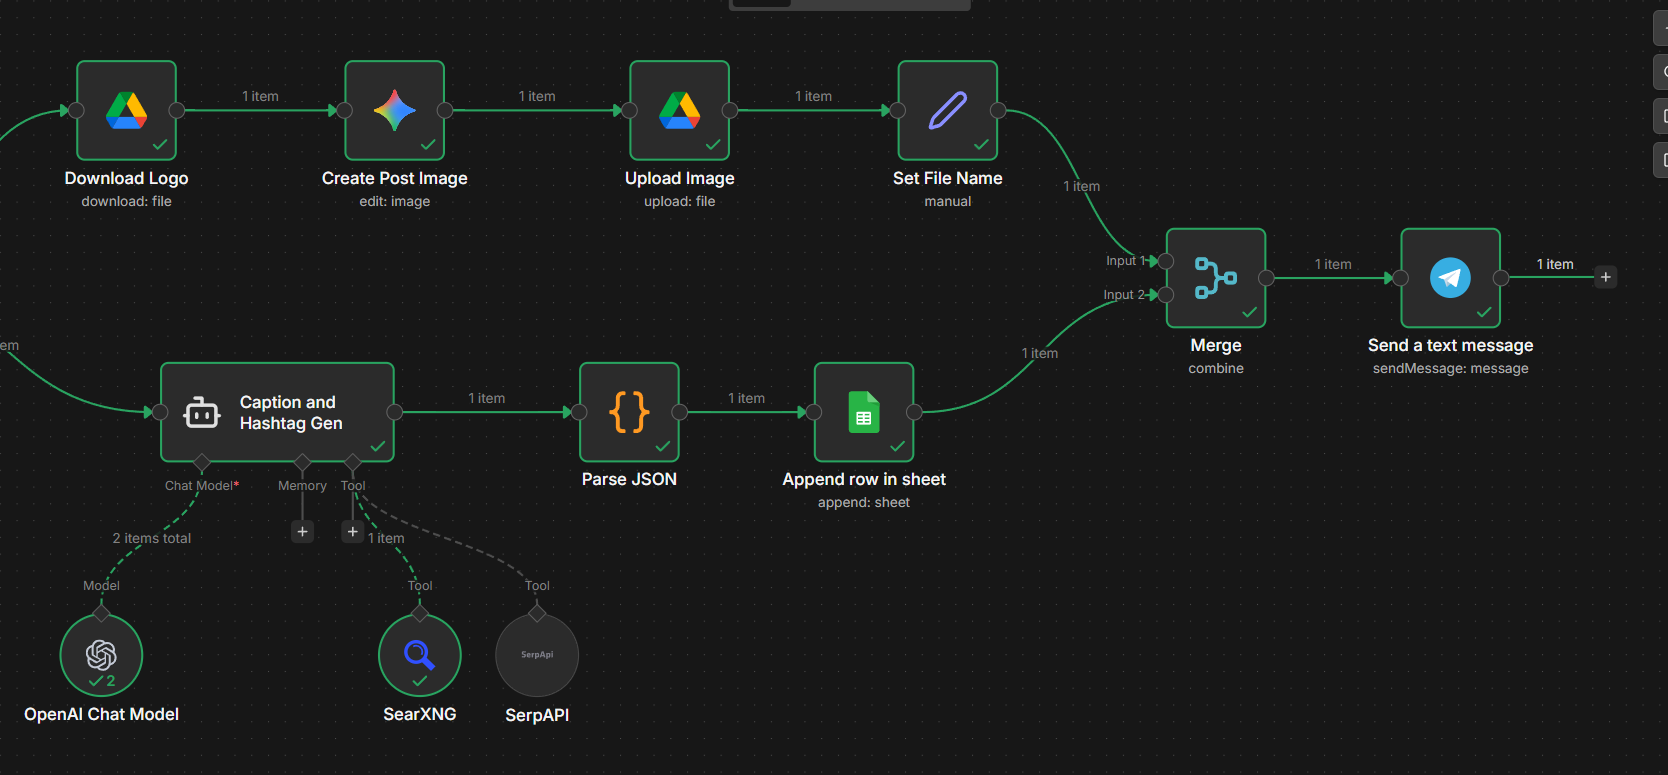
Caption and Hashtag Gen (AI Agent node)
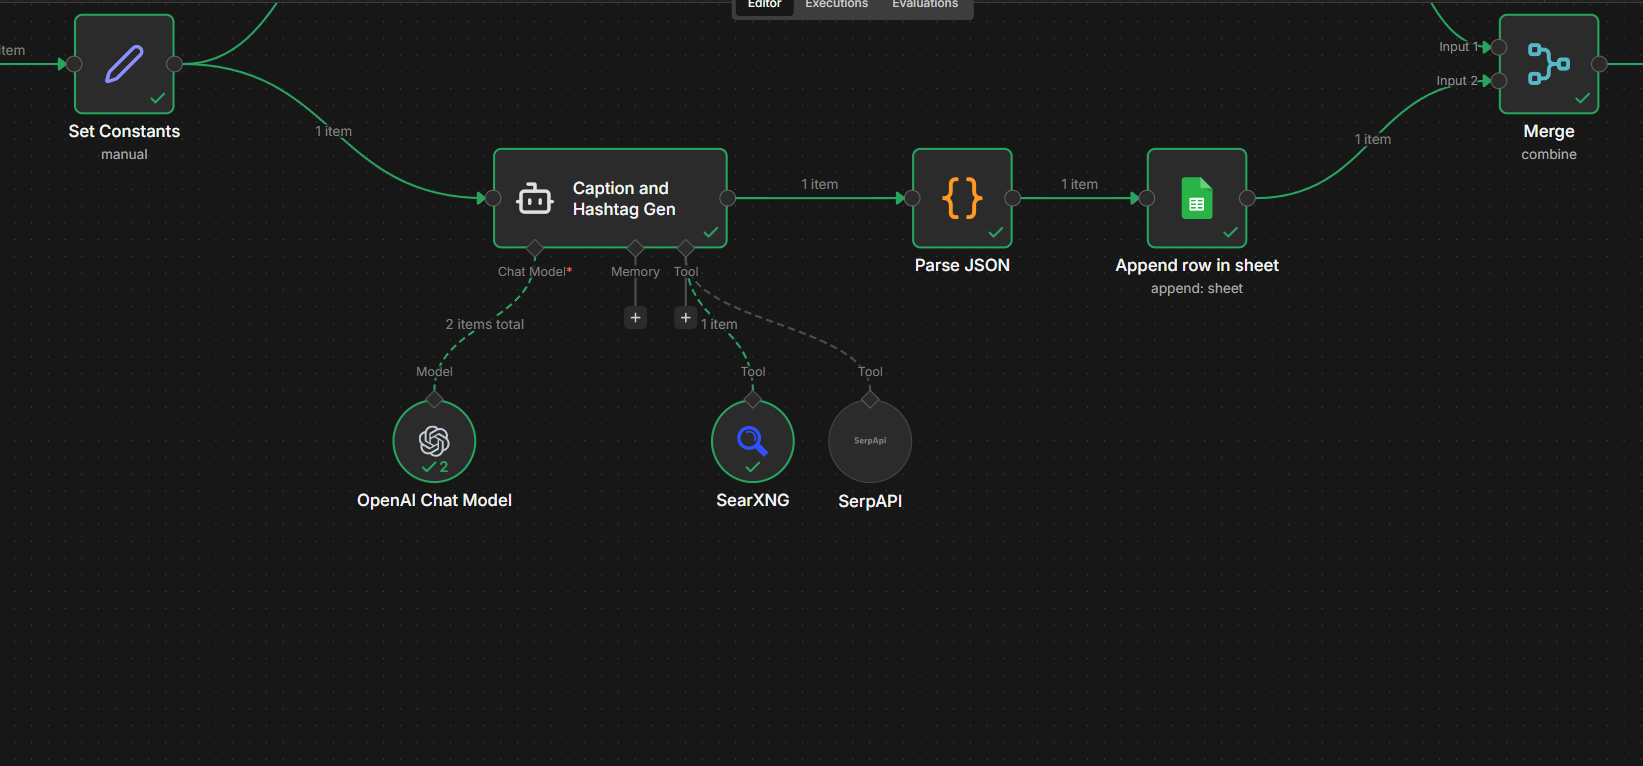
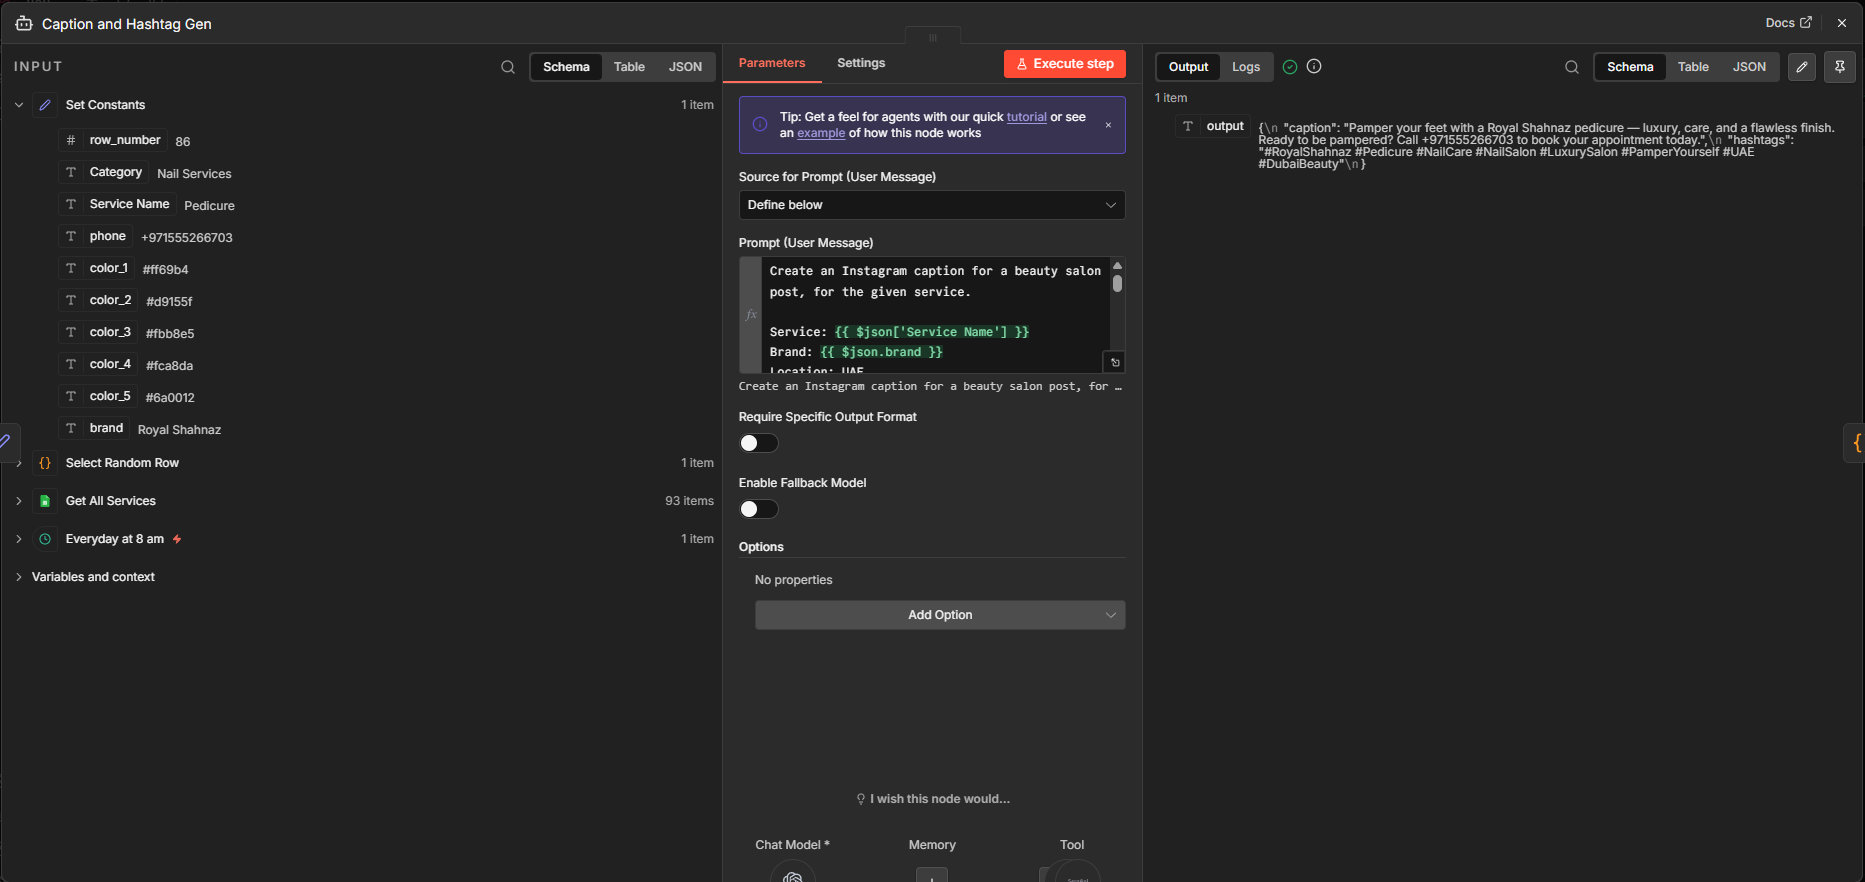
Added an AI Agent node for Caption and Hashtag generation. This node branches off from the “Set Constants” node. The idea is to perform different actions (image creation, caption creation) on different branches and merge the branches later.
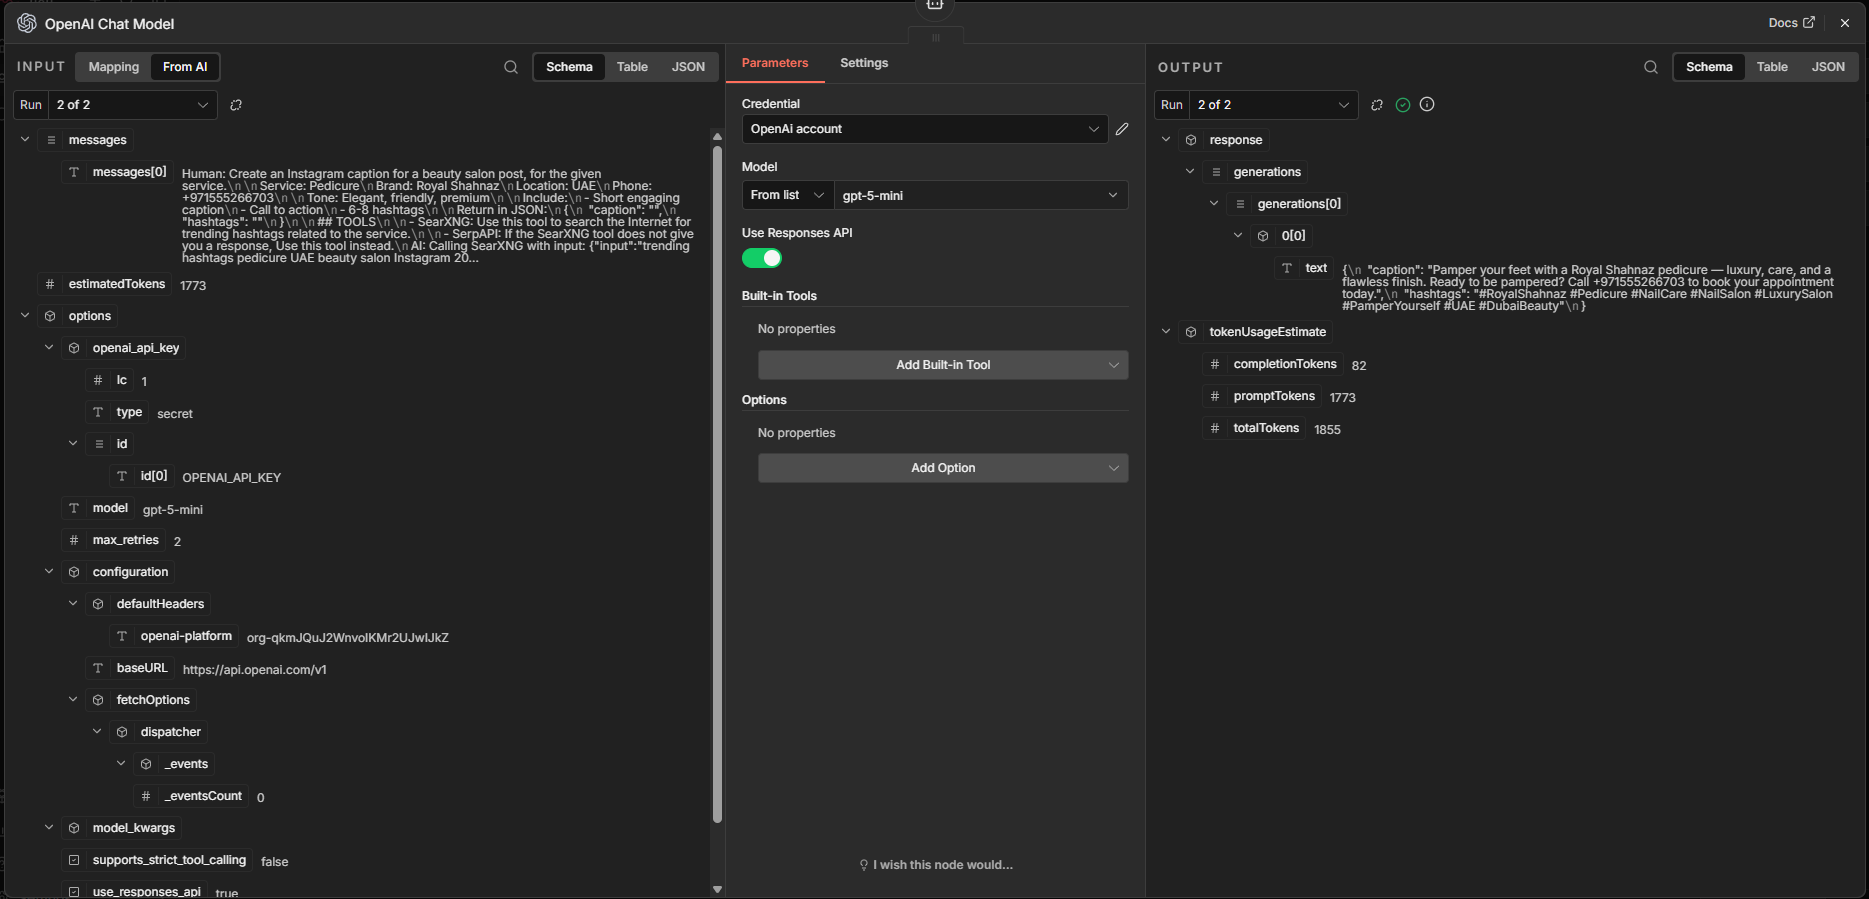
These nodes are connected to the AI Agent node:
- OpenAI Chat Model – gpt-5-mini
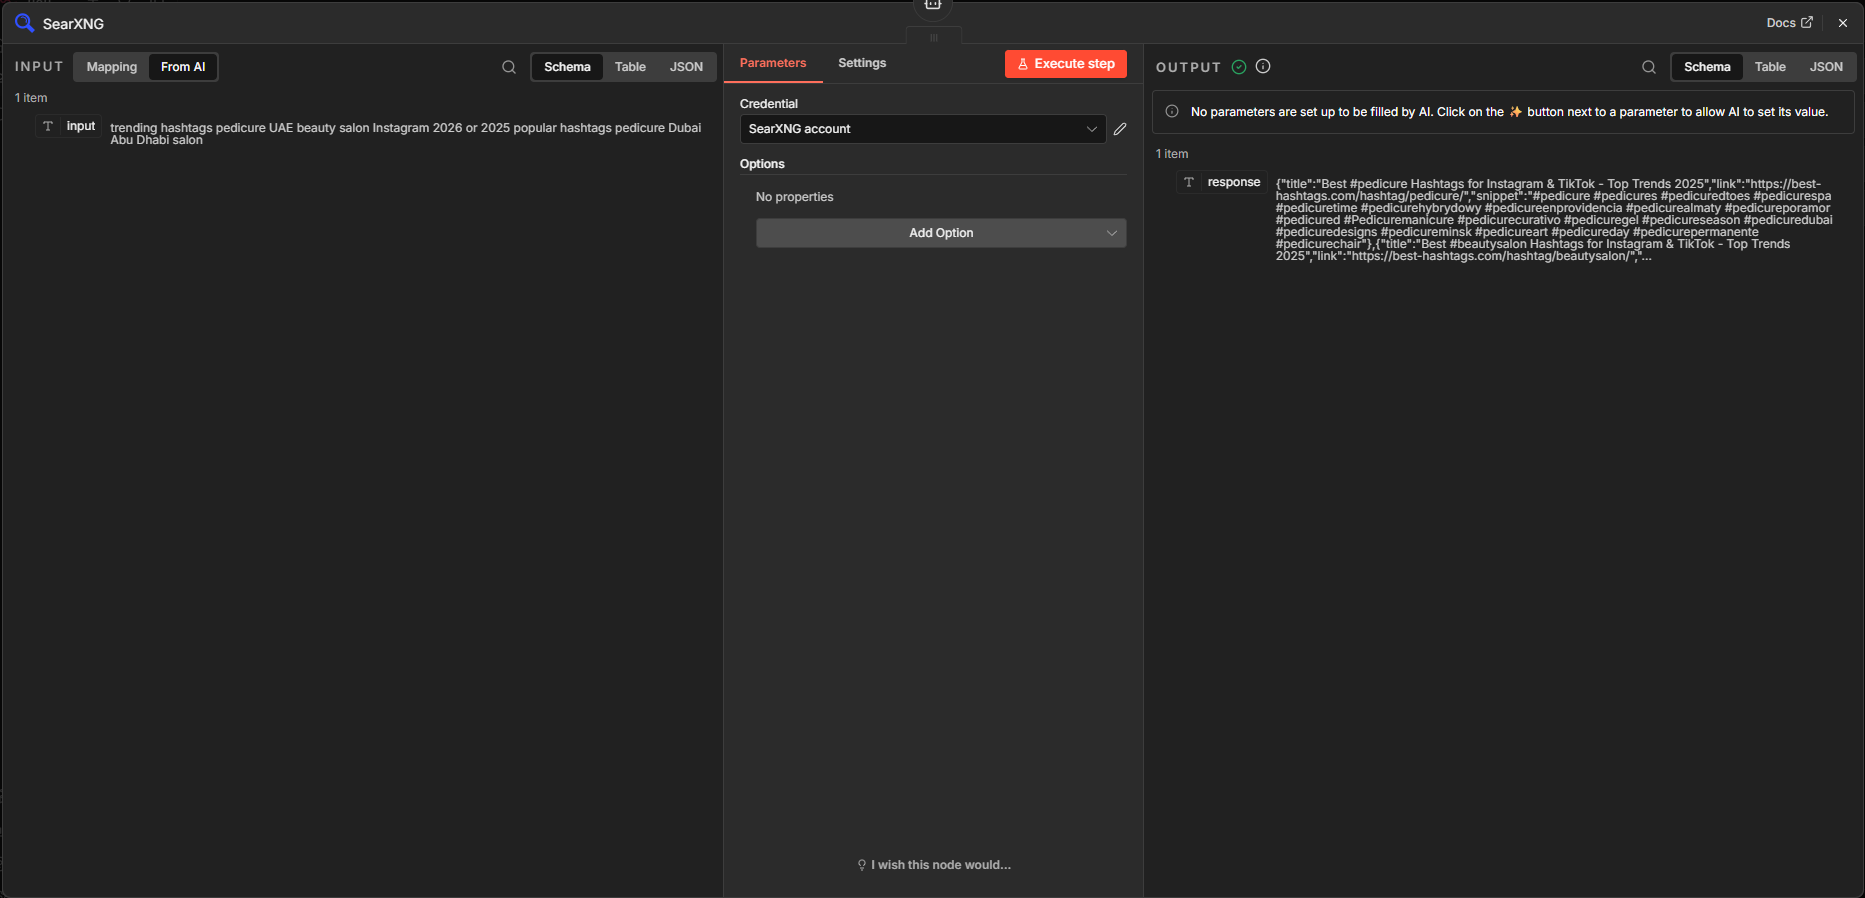
- SearXNG – Tool to search the Internet
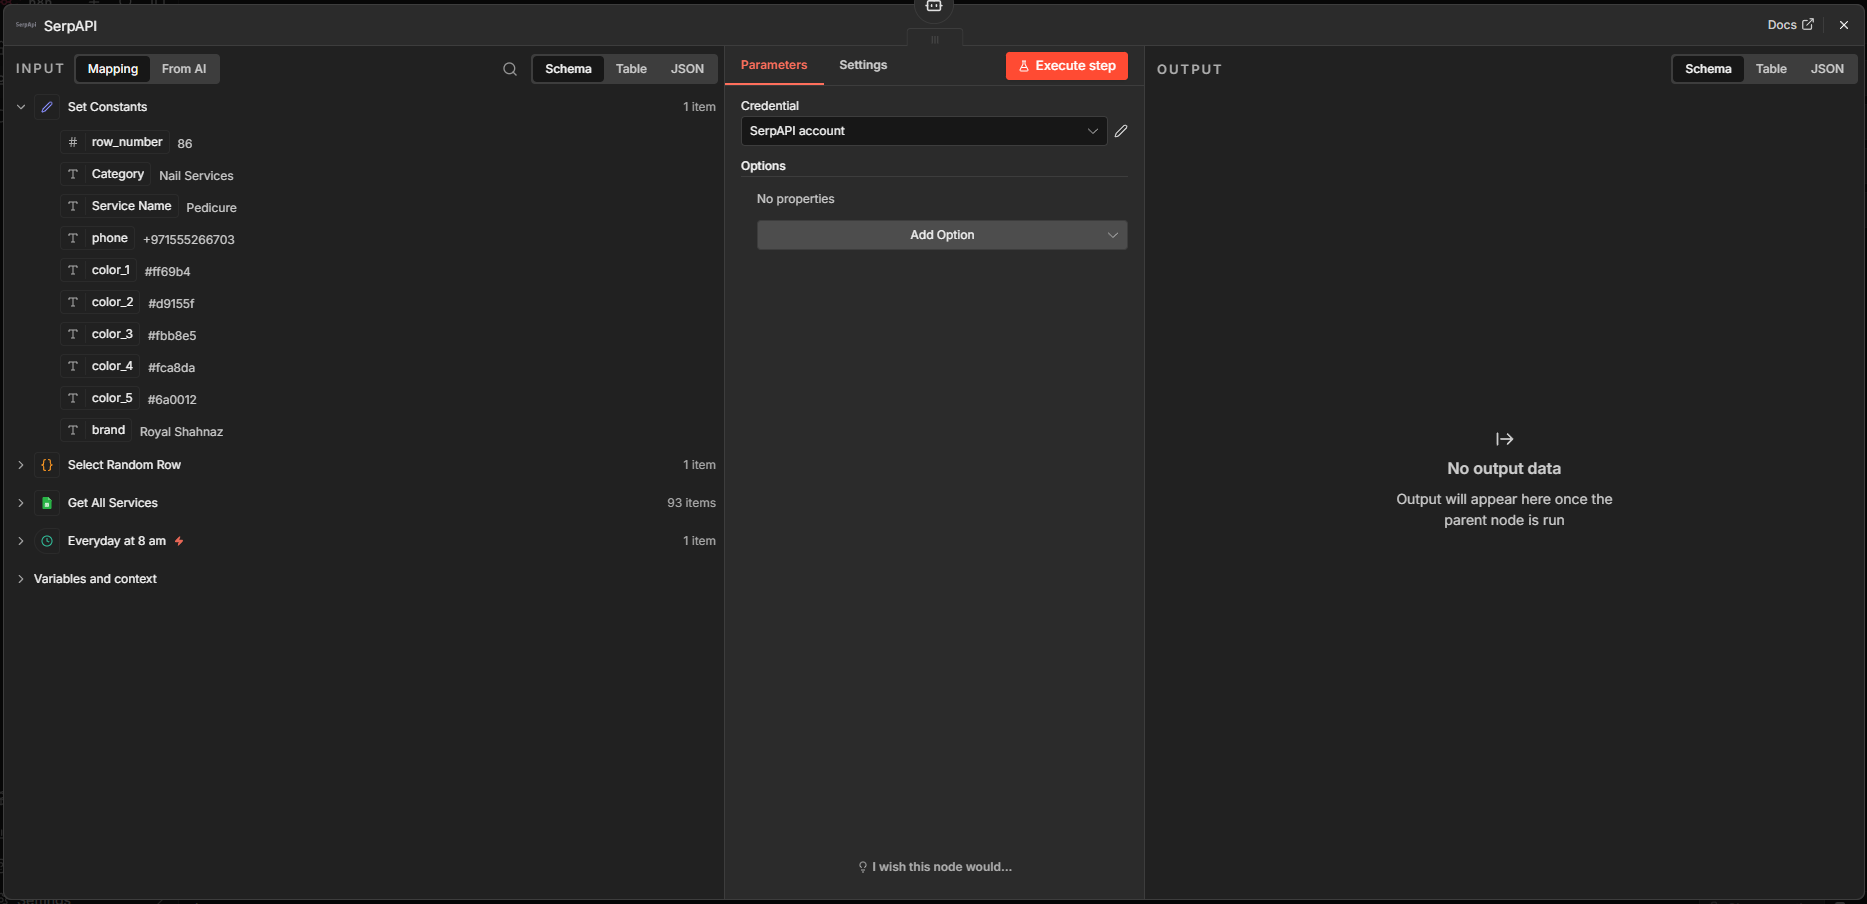
- SerpAPI – Another tool to search the Internet, in case SearXNG does not work.
By the way, SearXNG is my own self hosted search engine running on my VPS.
Of course, a prompt is needed for Caption and Hashtag generation and I needed a JSON output for further processing:
					Create an Instagram caption for a beauty salon post, for the given service.

Service: {{ $json['Service Name'] }}
Brand: {{ $json.brand }}
Location: UAE
Phone: {{ $json.phone }}

Tone: Elegant, friendly, premium

Include:
- Short engaging caption
- Call to action
- 6-8 hashtags

Return in JSON:
{
 "caption": "",
 "hashtags": ""
}

## TOOLS

- SearXNG: Use this tool to search the Internet for trending hashtags related to the service.

- SerpAPI: If the SearXNG tool does not give you a response, Use this tool instead.
Parse JSON (Code node)
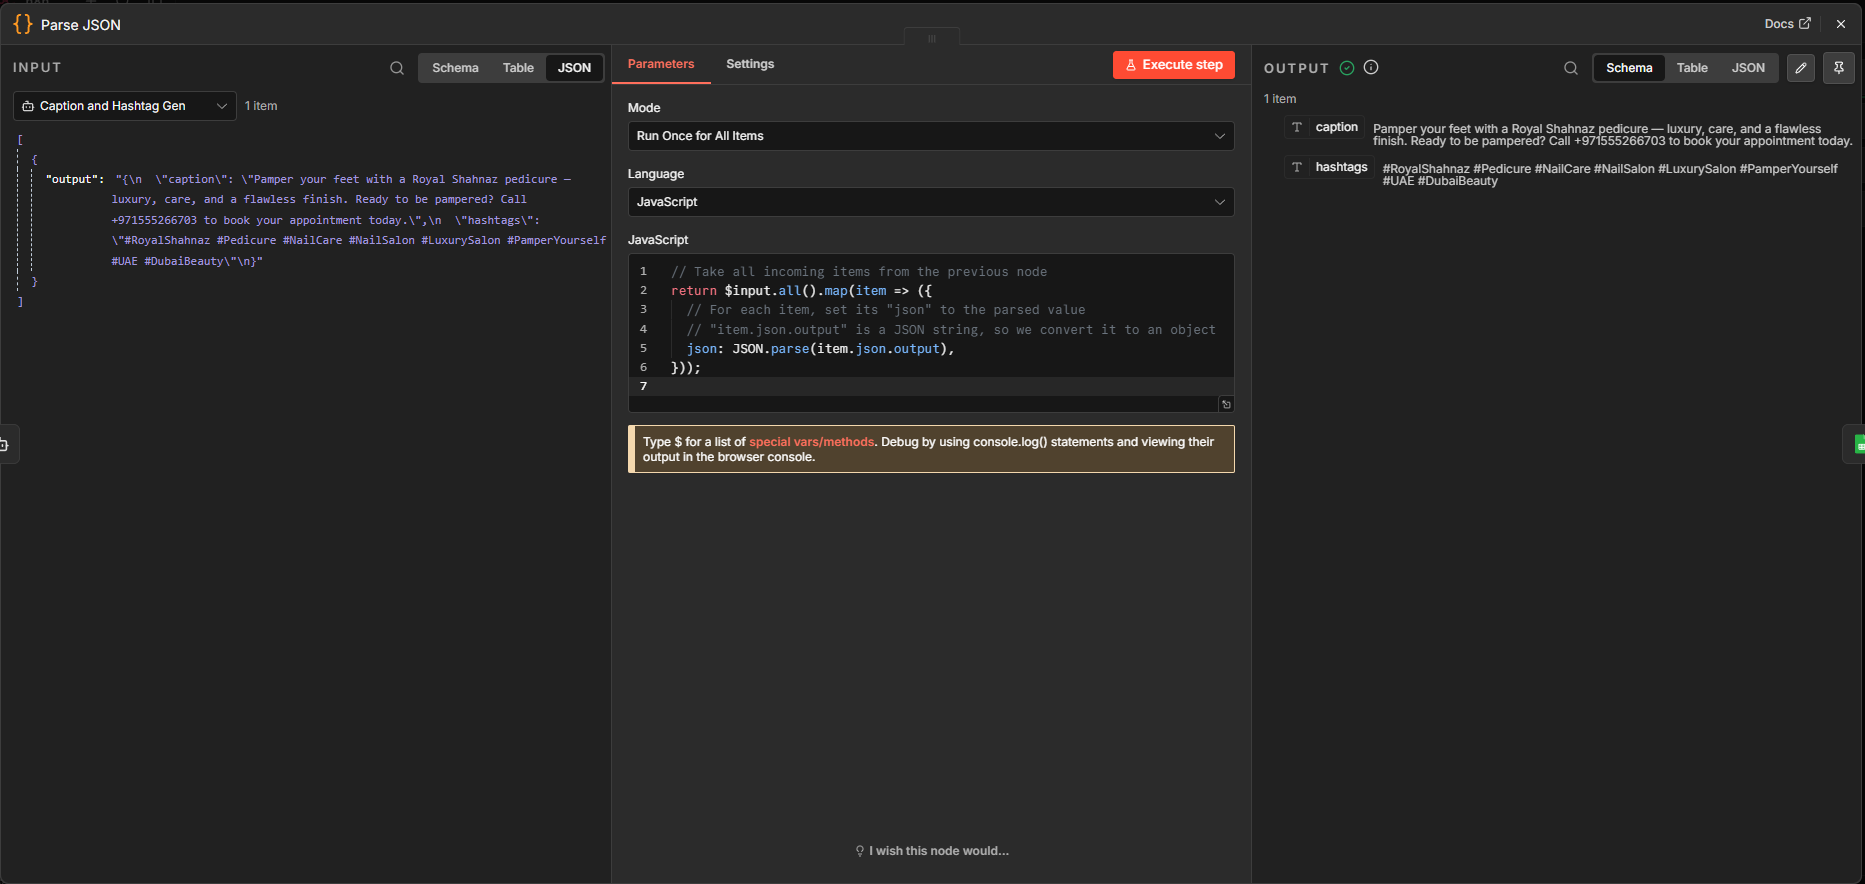
Code node, once more. The JSON output from the AI Agent needs to be parsed. JSON.parse is being used to convert the JSON string into a JS object.
What This Code Is Doing
- Takes all incoming items
- Extracts a JSON string from each item
- Converts it into a real object
- Outputs clean, usable JSON
					// Take all incoming items from the previous node
return $input.all().map(item => ({
  // For each item, set its "json" to the parsed value
  // "item.json.output" is a JSON string, so we convert it to an object
  json: JSON.parse(item.json.output),
}));
Append row in sheet (Google Sheets)
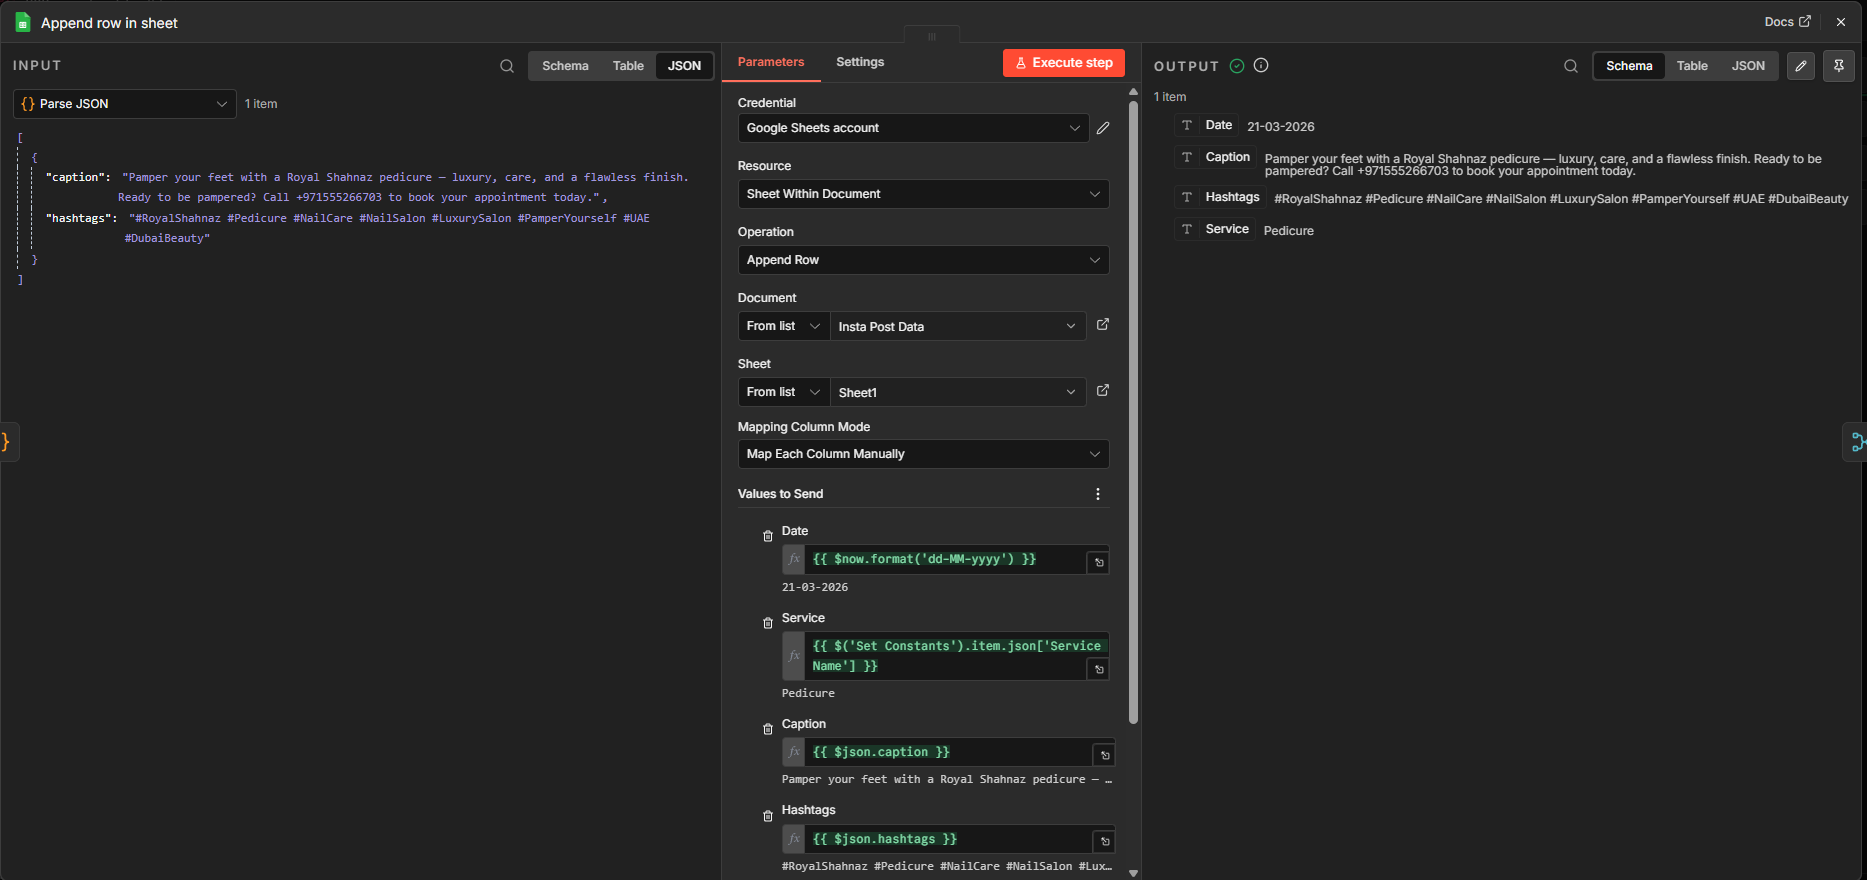
I used a Google Sheets node to append a row to a Google Sheet called “Insta Post Data” with the headers: Date, Service, Caption, Hashtags. The relevant action is “Append row in sheet”.
Merge node
Next up is a Merge node where both inputs are combined to a single output.
Send a text message (Telegram)
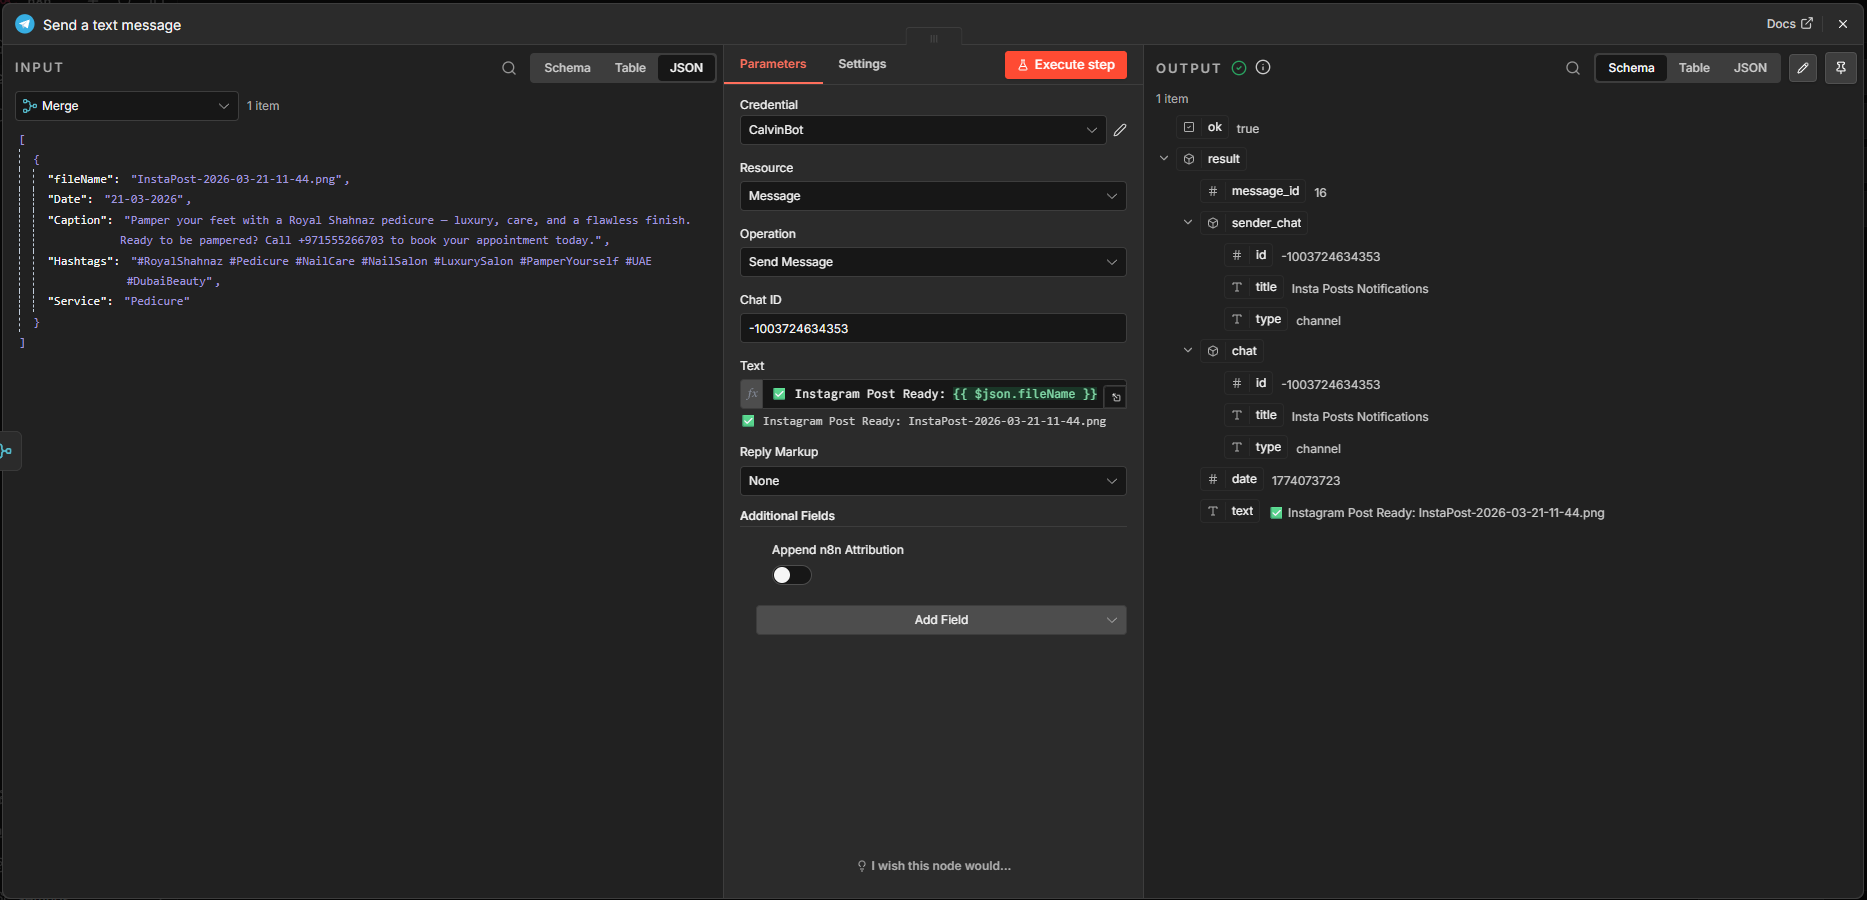
Lastly, I used a Telegram node with the action “Send a text message”. When the workflow completes successfully, it sends a message with the image file name.
Tools and Tech Stack Used
n8n (Automation)
n8n is the core automation engine that connects all parts of this workflow into a single system. It allows you to design workflows visually and automate repetitive tasks without heavy coding. In this project, n8n handles everything from fetching data to triggering AI models and storing outputs, making the entire Instagram post creation process fully automated and scalable.
OpenAI GPT-5-mini (Text Generation)
GPT-5-mini is used to generate engaging Instagram captions and relevant hashtags based on the selected service. It ensures that each post has a professional tone, includes a call to action, and uses optimized hashtags to improve reach. This removes the need for manual copywriting while maintaining high-quality content.
Google Gemini (Image Generation)
Google Gemini, specifically the Nano Banana image model, is used to create visually appealing Instagram post images. It generates high-quality, branded visuals based on prompts that include service details, colors, and style guidelines. This eliminates the need for a graphic designer for everyday content creation.
Google Sheets (Database)
Google Sheets acts as a simple and effective database for storing service data and logging generated content. It provides the input for the workflow and also stores outputs like captions, hashtags, and post details. This makes it easy to track content history and manage your Instagram strategy.
Google Drive (Storage)
Google Drive is used to store the generated Instagram post images in an organized manner. Each file is saved with a unique name, making it easy to retrieve and manage content. This ensures that all assets are safely stored and accessible for future use or posting.
Telegram (Notifications)
Telegram is used as a notification system to alert you when a new Instagram post is ready. Instead of constantly checking the workflow, you receive a real-time message with the post details. This allows for quick review and approval before publishing, adding a human checkpoint to the automation.
How to Set Up This Workflow Yourself
- Choose your n8n setup – self hosted or Cloud
- Sign up for n8n Cloud
- Import the workflow file (.json) (download mine, create a workflow and choose “Import from file”.)
- Prepare Google Sheets (download mine or copy it to your Google Drive)
- Connect all API’s
- OpenAI
- Google Sheets
- Google Drive
- SerpAPI
- You may delete the SearXNG node if you do not have a SearXNG instance.
- If you want to use the SearXNG node, you may try a public instance.
- Customize the prompts according to your use case.
Customization Ideas
You can easily customize this workflow based on your needs. Instead of a beauty salon, you can use it for other businesses like restaurants, real estate, or fitness brands by simply changing the data in your Google Sheet. You can also add new features like auto-posting to Instagram using APIs, generating captions in multiple languages, or creating posts for special events and seasonal offers.
With these changes, this workflow can grow into a complete Instagram content engine that runs your social media with very little manual effort.
Benefits of This System for Businesses
This system helps businesses post consistently without daily effort, which improves visibility on Instagram. It reduces costs by removing the need for designers and content writers for every post. Content is created much faster using AI, saving valuable time. It also scales easily, so businesses can produce more content as they grow.
This is especially useful for local businesses like salons in Kerala or the UAE that want regular social media activity without hiring a full team.
Limitations and Considerations
While this system is powerful, there are a few things you should keep in mind. First, AI-generated images may not always be perfect. Sometimes the design, text, or layout may need small edits before posting. It is always a good idea to review the image to make sure it matches your brand style.
Second, Instagram has API limitations. Full automation, like direct posting, may not always be easy or allowed depending on your setup. You may still need to manually upload posts or use approved tools.
Third, AI can generate content quickly, but it cannot fully replace human creativity. You may need to guide the tone, ideas, and messaging to make your posts more unique and engaging.
Finally, maintaining branding consistency is important. Colors, fonts, and style should stay the same across all posts. Even though the workflow uses fixed brand settings, regular checks will help ensure everything looks professional and aligned with your business identity.
Conclusion
AI and n8n together create a powerful system for Instagram post creation. With this workflow, you can generate images, captions, and hashtags automatically, saving time and effort. It helps you stay consistent on Instagram without doing everything manually.
You can use this workflow as it is or customize it for your own business. Change the data, update the design, or add new features based on your needs. Over time, this can become a complete content engine for your brand.
If you want to get started, download the workflow JSON and try it yourself. Test it, improve it, and make it your own. If you found this useful, feel free to share it or connect with me for more AI and automation ideas.
Melvin C Varghese is an author with more than 8 years of expertise in DevOps, SEO and SEM. His portfolio blogs include a Digital Marketing blog at https://melvincv.com/blog/ and a DevOps blog at https://blog.melvincv.com/. He is married with 2 small kids and is a simple person who eats, sleeps, works and plays. He loves music, comedy movies and the occasional video game.